Difference between revisions of "PlayStation Portable"
m |
|||
| (8 intermediate revisions by 4 users not shown) | |||
| Line 1: | Line 1: | ||
[[File:PSP-1000.jpg|right|350px|link=]] | [[File:PSP-1000.jpg|right|350px|link=]] | ||
| − | The PlayStation Portable (or PSP) is a handheld game console made by Sony in | + | The '''PlayStation Portable''' (or '''PSP''') is a handheld game console made by Sony Computer Entertainment and was released on December 12, 2004 in Japan and everywhere else in 2005. |
| − | + | The PlayStation Portable is the only handheld video game console to use Universal Media Disc (UMD) as its primary storage medium. | |
==Ripping Tools== | ==Ripping Tools== | ||
| Line 39: | Line 39: | ||
* '''.[[GMO]]''' - Model/Animation data (supported by [[Noesis]]) | * '''.[[GMO]]''' - Model/Animation data (supported by [[Noesis]]) | ||
* '''.[[GIM]]''' - Texture/Sprite data (supported by [[Noesis]]) | * '''.[[GIM]]''' - Texture/Sprite data (supported by [[Noesis]]) | ||
| + | * '''.[[PMF]]''' - Video data (partially supported by [[VLC Media Player]] and [[Media Player Classic]] (Missing audio)) | ||
| + | ==Recommended Emulators== | ||
| + | ===PPSSPP=== | ||
| + | Good PSP emulator with high compatibility. | ||
| + | ==== GE Debugger Tutorial ==== | ||
| + | PPSSPP comes with a graphics viewer that not only draws out the frame, but also presents sprites in their entirety depending on the game used. | ||
| + | |||
| + | GE Debugger can be accessed in the Debug menu, or by pressing Ctrl G, at any point during gameplay. | ||
| + | |||
| + | [[File:GEDebuggerBreakdown.png|center]] | ||
| + | |||
| + | # Step Frame: Advances emulator by one frame. | ||
| + | # Step Tex: Draws current frame one texture at a time (Background, shadows if any, sprites, passable objects). | ||
| + | # Step Draw: Draws current frame one tile at a time. | ||
| + | # Step Prim: A faster method of Step Draw, but with a red highlight that passes through the drawn scene, adding more tiles with each press of the button. Holding down Enter while Step Prim is highlighted will draw the entire scene quicker and jump to the next frame. | ||
| + | # Step Into: Similar to Step Prim, but focuses on adding connected tiles and sprites obtained from the "CLUT" (a.k.a "clutter", first shown in the smaller of the two windows). | ||
| + | # Resume: Unpauses Emulator while GE Debugger is still active. | ||
| + | # Force Opaque: Adds transparency, though some portions will only dim the transparency to a nonexistent shade. | ||
| + | # Show CLUT: Replaces current frame with the tiles or sprites that have been drawn into the frame, while adding their palettes to the smaller window. | ||
| + | |||
| + | It is best to pause the emulator at the point you wish to view or rip sprites by pressing F8 as it will not automatically pause once the window appears. Afterwards, click on the emulator and unpause it. The first time will still freeze the emulator, but afterwards, you must press one of the "Step" buttons in order to halt progress. | ||
| + | |||
| + | When accessing a new frame, the entire scene will be washed out, leaving you to press any of the "Step" buttons in order to draw the scene in. There is currently no known way of saving either the background or the CLUT other than printing the screen and pasting it to a paint editing software. | ||
| + | |||
| + | For Backgrounds, it's best to use "Step Tex" to draw the scene as it appears (minus any passable objects), then Print Screen to whichever paint software you desire, then continue drawing the frame until the rest of the background is presented, or combine them with tiles matching whichever part of the object is tangible. | ||
| + | |||
| + | For Sprites, make sure "Show CLUT" is unchecked. GE draws the frame from back to front, meaning the tiles for the farthest background will be drawn first. Press "Step Tex" until you see the incomplete background, then use "Step Draw" while paying attention to the CLUT on the smaller window until the tiles switch to the current sprites in the area. Check "Show CLUT" and you will quickly notice that the sprites are too small and pixelated to be ripped. That's because both windows, by default, shrinks the sheet to fit their dimensions. Double clicking the window the CLUT shows up in will zoom them to their proper size, so all that's left is to find the appropriate sprites by clicking anywhere within the window and dragging it around until the sprites appear. | ||
| + | |||
| + | ===Jpcsp=== | ||
| + | Jpcsp is a Java PSP emulator. It can rip 3D models from games. | ||
| + | |||
| + | In order to do this, you must load a game, find it in the UMD browser or the file opener. Then play where you want to rip the textures. The, click on File > Export 3D Scene, then click on visible or all 3D models. Then go to export, on the JPCSP folder, and go to the recent one. This won't work sometimes when playing original games on Namco Museum Battle Collection, or some different reasons. If you try opening the .obj file like that, it won't load, but if done correctly, it can be usable. | ||
| + | |||
| + | Not only that, but just like PPSSPP, it includes A GE Debugger, in which can allow to see graphics, as the opposite of the one stated on the top before. | ||
| + | [[File:Image viewer 7 11 2020 3 58 49 PM.png|thumb]] | ||
| + | [[File:Jpcsp v0.7 cc4e331 - ナムコミュージアム (ULJS00012) FPS 61, averageFPS 54.2 6 18 2020 6 21 51 PM.png|thumb]] | ||
==Specific Game Pages== | ==Specific Game Pages== | ||
Latest revision as of 03:28, 7 April 2023
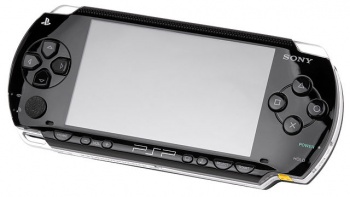
The PlayStation Portable (or PSP) is a handheld game console made by Sony Computer Entertainment and was released on December 12, 2004 in Japan and everywhere else in 2005.
The PlayStation Portable is the only handheld video game console to use Universal Media Disc (UMD) as its primary storage medium.
Contents
Ripping Tools
Most PSP game rips come in the form of an ISO file. These can be mounted or viewed using standard mounting tools, such as Daemon Tools, and the game's files can be viewed using your computer's file explorer.
In some cases, games will come in ".CSO" format. These will need to be converted into an ISO format before being used. There are a number of conversion tools available online.
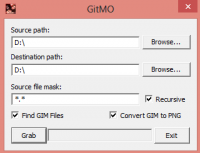
Gitmo
Gitmo is a free tool that finds and extracts GMO and GIM files. It is available for Windows at www.richwhitehouse.com.
In order to use it you need to:
- Specify the path to a file or a folder you wish to search
- Specify the path to the folder where you want found files to be extracted
- Click the "Grab" button
It is also possible to convert extracted GIM files to PNG right away or disable the extraction of GIM files at all.
The main downside of this method is that Gitmo can not extract the files with their original names and directory structure. It makes identifying the models and finding correct textures troublesome, but in many cases it is the only available option.
Texture Extractor/Reinserter (TextER)
TextER can be found for Windows at www.romhacking.net. It allows you to extract .GIM files found within other files. This method doesn't return the correct file names, but the benefit it gives over Gitmo is that it can be used from a command line, gives a better file name as a result, and often produces more reliable results.
A batch file can be created to make ripping GIM files from multiple containers quicker. Save the code below into a ".bat" file, and include it in the same file as texter. Running the .bat file will then extract any gim files found within all of the files in the same folder as both TextER.exe and your batch file.
for %%X in (*.*) do texter -e "%%X" -gim
GimConv
Noesis
Can be used with several common sprite, texture and model formats for the PSP, as well as a number of specific PSP games.
For more information, see the Noesis page.
Common File Formats
- .GMO - Model/Animation data (supported by Noesis)
- .GIM - Texture/Sprite data (supported by Noesis)
- .PMF - Video data (partially supported by VLC Media Player and Media Player Classic (Missing audio))
Recommended Emulators
PPSSPP
Good PSP emulator with high compatibility.
GE Debugger Tutorial
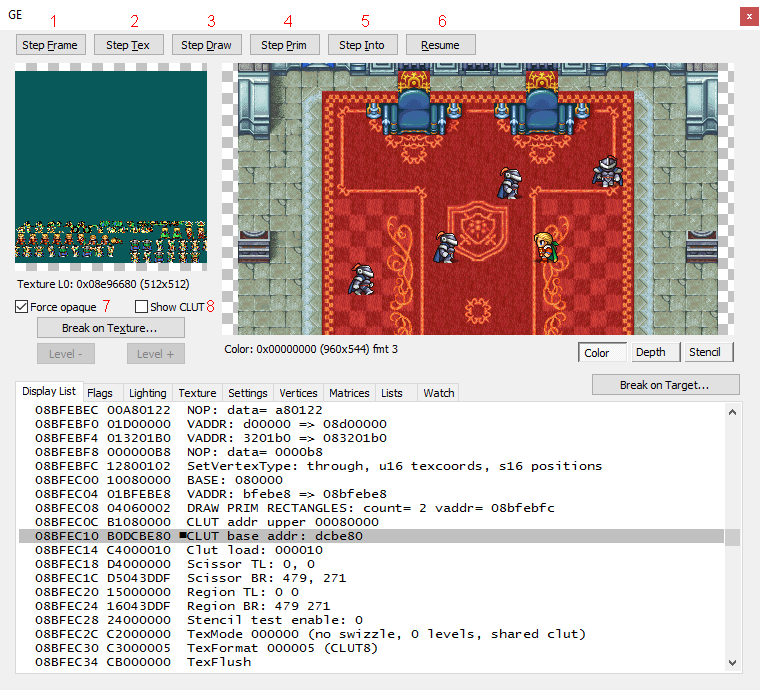
PPSSPP comes with a graphics viewer that not only draws out the frame, but also presents sprites in their entirety depending on the game used.
GE Debugger can be accessed in the Debug menu, or by pressing Ctrl G, at any point during gameplay.
- Step Frame: Advances emulator by one frame.
- Step Tex: Draws current frame one texture at a time (Background, shadows if any, sprites, passable objects).
- Step Draw: Draws current frame one tile at a time.
- Step Prim: A faster method of Step Draw, but with a red highlight that passes through the drawn scene, adding more tiles with each press of the button. Holding down Enter while Step Prim is highlighted will draw the entire scene quicker and jump to the next frame.
- Step Into: Similar to Step Prim, but focuses on adding connected tiles and sprites obtained from the "CLUT" (a.k.a "clutter", first shown in the smaller of the two windows).
- Resume: Unpauses Emulator while GE Debugger is still active.
- Force Opaque: Adds transparency, though some portions will only dim the transparency to a nonexistent shade.
- Show CLUT: Replaces current frame with the tiles or sprites that have been drawn into the frame, while adding their palettes to the smaller window.
It is best to pause the emulator at the point you wish to view or rip sprites by pressing F8 as it will not automatically pause once the window appears. Afterwards, click on the emulator and unpause it. The first time will still freeze the emulator, but afterwards, you must press one of the "Step" buttons in order to halt progress.
When accessing a new frame, the entire scene will be washed out, leaving you to press any of the "Step" buttons in order to draw the scene in. There is currently no known way of saving either the background or the CLUT other than printing the screen and pasting it to a paint editing software.
For Backgrounds, it's best to use "Step Tex" to draw the scene as it appears (minus any passable objects), then Print Screen to whichever paint software you desire, then continue drawing the frame until the rest of the background is presented, or combine them with tiles matching whichever part of the object is tangible.
For Sprites, make sure "Show CLUT" is unchecked. GE draws the frame from back to front, meaning the tiles for the farthest background will be drawn first. Press "Step Tex" until you see the incomplete background, then use "Step Draw" while paying attention to the CLUT on the smaller window until the tiles switch to the current sprites in the area. Check "Show CLUT" and you will quickly notice that the sprites are too small and pixelated to be ripped. That's because both windows, by default, shrinks the sheet to fit their dimensions. Double clicking the window the CLUT shows up in will zoom them to their proper size, so all that's left is to find the appropriate sprites by clicking anywhere within the window and dragging it around until the sprites appear.
Jpcsp
Jpcsp is a Java PSP emulator. It can rip 3D models from games.
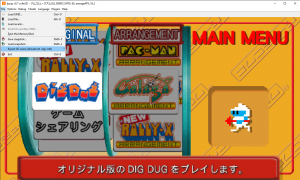
In order to do this, you must load a game, find it in the UMD browser or the file opener. Then play where you want to rip the textures. The, click on File > Export 3D Scene, then click on visible or all 3D models. Then go to export, on the JPCSP folder, and go to the recent one. This won't work sometimes when playing original games on Namco Museum Battle Collection, or some different reasons. If you try opening the .obj file like that, it won't load, but if done correctly, it can be usable.
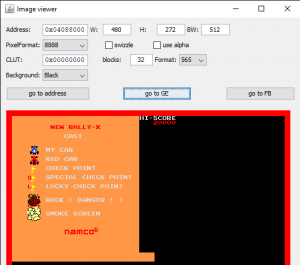
Not only that, but just like PPSSPP, it includes A GE Debugger, in which can allow to see graphics, as the opposite of the one stated on the top before.

