Crisis Core: Final Fantasy VII/Model Ripping
Ripping the models from Final Fantasy VII: Crisis Core is fairly straight forward, Noesis will do all the hard work for you. This game is probably one of the easiest games to rip models from. Noesis carries most of the heavy lifting, so don't sweat it.
| Final Fantasy VII: Crisis Core - Model Ripping |
|---|
|
Game: Final Fantasy VII: Crisis Core |
Contents
Required Files & Tools
- Your own Crisis Core: Final Fantasy VII Dump
- Noesis
- Notepad++
- A 3D Modelling Software (3DS Max, Blender, Maya, etc.)
Tutorial
Step 1: Extracting the ISO
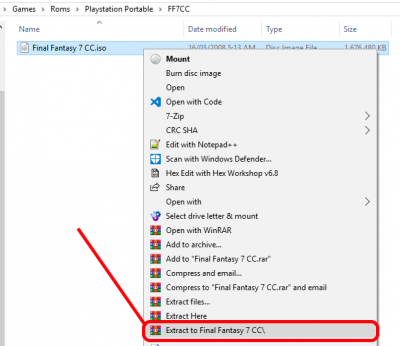
Extract your Final Fantasy VII: Crisis Core ISO file using something like WinRAR or whatever other tools you have that can extract iso files.
Step 2: Extracting discimg.pkg file
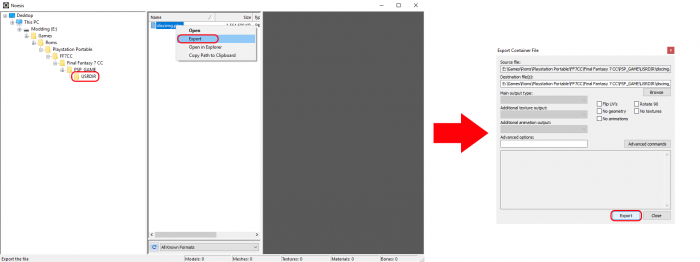
Open up Noesis and navigate to the directory where you extracted your iso and find a file called "discimg.pkg" in \PSP_GAME\USRDIR. From there you will want to right click on it and select "export". Now press "export" on the popup window. This will extract all the files from the archive.
Step 3: Finding the models
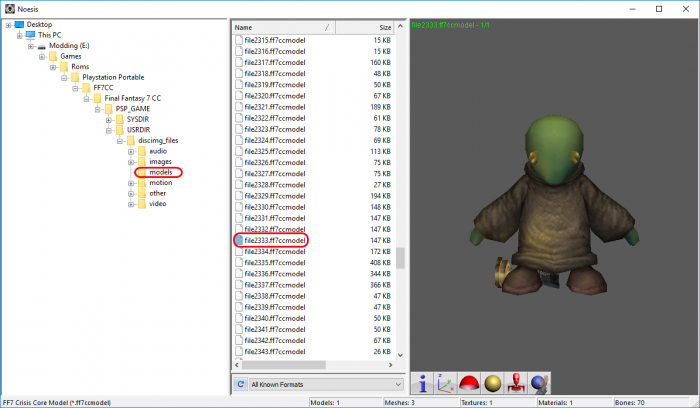
Once all the files have been exported, close the popup window and click on the little "+" icon next the "USRDIR" folder on the left. Now you will see a new folder, "discimg_files", click on the little "+" icon again and click on the folder titled "models". Now a long list of models will show up. These models contain Characters, Monsters, Levels, Props, Vehicles and Weapons. Double click on a file, and admire what your hard work has accomplished thus far.
Step 4: Exporting the model
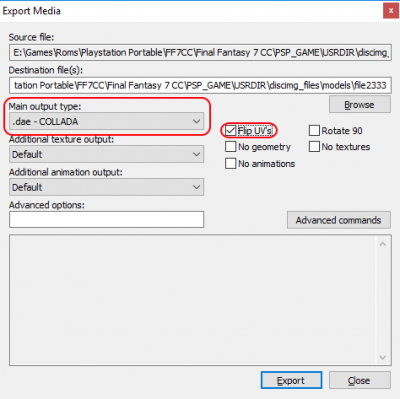
Right-Click on a .ff7ccmodel file that you want to rip and select "export". Remember the name of this model. In the popup window, select "Flip UV's". This is done because Noesis has a tendancy to flip the UV's itself when exporting the model. Make sure to set "Main output type" to .dae so that we export the model with rigging. Last thing to do is in the "Destination file(s)" section, go to the end and remove the "out" from the file name.
(eg. file2333out to file2333)
Step 5: Moving the files to their own folder
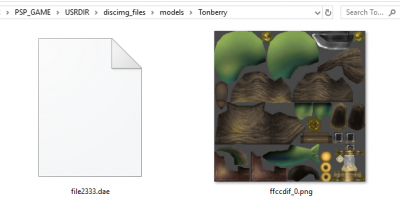
Left-Click "OK" and close the popup. You can now close Noesis. Now in windows explorer you will want to open the directory where your FF7CCMODEL files are. You should find a .dae and couple textures. The amount of .png files you find depends on the model you are exporting. Select all the exported files (.dae and .png) and press "CTRL-X" or Right-Click and select "Cut". Create a new folder for your rip and press "CTRL-V" or Right-Click and select "Paste".
Step 6: Fixing texture paths
Now we need to fix up the texture paths in the dae file. Open up the .dae in Notepad++ and look for any instances of "<init_from>". Make sure that it is formated similarly to this. You may need to add .png to the end of the file name or remove any excess bits from the start. This is so that it reads the texture from the same folder as your .dae file.

Step 7: Finishing up
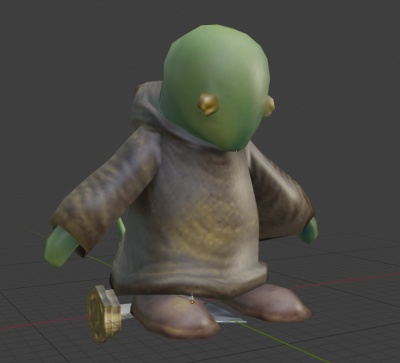
Import the .dae into whatever 3D Modelling program you use and check that the rig and textures are loading fine. Render the image, and voila, you've officially ripped your first Final Fantasy VII: Crisis Core model!
Closing
Hopefully you've learnt something from this tutorial and now have a working model rip! If you have any feedback or questions, feel free to ask on the talk page for this tutorial.
