Difference between revisions of "User:Ziella/Sandbox2"
| (8 intermediate revisions by the same user not shown) | |||
| Line 1: | Line 1: | ||
| − | |||
{{TutorialInfo | {{TutorialInfo | ||
| − | | title= | + | | title= Pokémon Sword / Shield |
| − | | game= | + | | game= Pokémon Sword / Shield |
| − | | difficulty= | + | | category= Model Ripping |
| − | | duration= | + | | difficulty= Intermediate |
| − | | author= | + | | duration= 30 Minutes |
| + | | author= Ziella | ||
}}<br/> | }}<br/> | ||
==Required Files & Tools== | ==Required Files & Tools== | ||
| − | # | + | # The model files you want to rip. |
| + | # [[3DS Max]] (with OpenCollada installed) | ||
| + | # [https://mega.nz/file/HlpFXYDY#G9WcLuZupaCwboW3HRMoUS89oN-NQAK2UskZs-9rJOs RandomTalkingBush's Switch (Let's Go, Sword/Shield) MAXScript] | ||
# [[Noesis]] | # [[Noesis]] | ||
| − | |||
| − | |||
==Tutorial== | ==Tutorial== | ||
| − | ===Step 1: | + | ===Step 1: Downloading the models=== |
| − | + | Thanks to RandomTalkingBush, you can download the model files already extracted from their archives. Make sure you download the files that are named PMSwSh. After downloading the models, extract the .7z file using winrar or 7Zip to wherever you want.<br> | |
| − | + | https://mega.nz/folder/Tx4ziKbL#Fy4-wIjBjHx9EVw59dZCFg<br> | |
| + | ===Step 2: Converting the textures=== | ||
| + | [[File:PokemonSwSh Model Ripping Tutorial (1).png|left|250px]] After extracting the archive, decide what model you want to rip. For this tutorial I will be ripping Zekrom. | ||
| + | Open up Noesis and go '''Tools > Batch Process'''<br clear=all> | ||
| − | + | [[File:PokemonSwSh Model Ripping Tutorial (2).png|left|250px]] A window should then pop up. In the '''Input extension''' make sure it's says '''dds''' and in '''Output extension''' make sure it says '''png''' then replace '''$inpath$\$inname$_files\$inname$out.$outext$''' with '''$inpath$\$inname$.$outext$''' . You'll then want to press the '''Folder batch''' button and select the folder that contains the textures for your model, then press the '''Export''' button. This will convert all the .dds files into .png. After the textures have been converted, make a new folder somewhere for the rip and name it whatever the model you're ripping is. Inside that new folder make another folder called '''Textures''' then move all the .png textures you just converted into that folder.<br clear=all> | |
| − | |||
| − | |||
| + | ==Step 3a: "Fixing" the textures (Eye/Mouth)== | ||
| + | [[File:PokemonSwSh Model Ripping Tutorial (3).png|250px]]When ripping Pokemon models, most of the time the textures need to be fixed first. | ||
| + | Firstly, the eyes and mouth textures. To fix the '''"col"''' textures you'll need to double the width and mirror both sides of the texture.<br clear=all> | ||
| − | |||
| − | |||
| − | |||
| + | [[File:PokemonSwSh Model Ripping Tutorial (4).png|250px]] | ||
| + | To fix the eye/mouth "'''nor'''" textures you need to tile them them to match the col textures. 2 across, 4 down.<br clear=all> | ||
| − | + | ==Step 3b: "Fixing" the textures (Body)== | |
| − | + | [[File:PokemonSwSh Model Ripping Tutorial (5).png|left|350px]] | |
| − | + | Fixing the body textures are different. What you need to do is look at the normal map for the other textures. If it looks like it's symmetrical, then you'll need to edit the "amb", "col", etc. textures directly to match. Most of the time this is just done by doubling the canvas width and mirroring it to the right hand side.<br clear=all> | |
| − | |||
| − | + | ==Step 4: Splitting the textures== | |
| − | + | [[File:PokemonSwSh Model Ripping Tutorial (6).png|left|250px]] | |
| − | + | Any "amb" or "emi" textures in your rip should be split into their individual channels.<br clear=all> | |
| + | ==Step 5: Opening the model== | ||
| + | If you don't have RandomTalkingBush's Pokemon MaxScript yet, make sure you grab it from here: https://mega.nz/file/HlpFXYDY#G9WcLuZupaCwboW3HRMoUS89oN-NQAK2UskZs-9rJOs<br clear=all> | ||
| − | + | [[File:PokemonSwSh Model Ripping Tutorial (7).png|left|250px]] | |
| − | + | [[File:PokemonSwSh Model Ripping Tutorial (8).png|right|250px]] | |
| − | + | Move the .gfbmdl file from the folder the .dds textures were in to the same folder as your png textures. You'll then want to open up '''3DS Max''' and go '''Scripting > Run Script''' and open the Pokemon Switch MaxScript. | |
| + | A little window should pop up with a button that says "Import *.gfbmdl". Press it and it should ask you to open a .gfbmdl file. Select the one that's in your textures folder and it should import into 3DS Max.<br clear=all> | ||
| + | ==Step 6: Rotation and resetting the Bind Pose== | ||
| + | Select the root bone, in my case it's "pm0644_00", and rotate it 90 degrees on the X axis. | ||
| + | [[File:PokemonSwSh Model Ripping Tutorial (9).png|right|250px]] | ||
| + | [[File:PokemonSwSh Model Ripping Tutorial (10).png|left|250px]] | ||
| + | Now for every mesh in the scene, go to its "Skin" modifier and scroll down to "Advanced Parameters" and click "Save". Save it to somewhere you'll remember then right click the skin modifier and "Collapse All". Add a new skin modifier back onto that mesh and add all the bones onto it. Go back to "Advanced Parameters" but this time instead of pressing save, press load and select the envelope you saved earlier. | ||
| − | + | [[File:PokemonSwSh Model Ripping Tutorial (11).png|left|250px]] | |
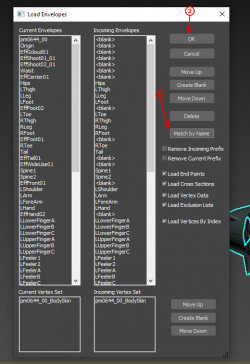
| − | + | A "Load envelope" window should pop up. Press "Match by name" then press "Ok". Repeat this multiple times for the rest of the meshes until you've done them all.<br clear=all> | |
| − | [[File: | ||
| − | + | ==Step 7: Exporting== | |
| − | == | + | Once you've reset the bind pose on all the meshes, you can now export your model as .fbx and .dae, go to the folder you created earlier that you put the textures folder inside of, and export them into that folder and you should be done and ready to render then submit! I highly suggest installing OpenCollada and exporting with that instead of the default collada exporter included with 3DS Max due to compatibility issues with other programs. |
| − | |||
Latest revision as of 12:30, 22 June 2020
| Pokémon Sword / Shield |
|---|
|
Game: Pokémon Sword / Shield |
Contents
Required Files & Tools
- The model files you want to rip.
- 3DS Max (with OpenCollada installed)
- RandomTalkingBush's Switch (Let's Go, Sword/Shield) MAXScript
- Noesis
Tutorial
Step 1: Downloading the models
Thanks to RandomTalkingBush, you can download the model files already extracted from their archives. Make sure you download the files that are named PMSwSh. After downloading the models, extract the .7z file using winrar or 7Zip to wherever you want.
https://mega.nz/folder/Tx4ziKbL#Fy4-wIjBjHx9EVw59dZCFg
Step 2: Converting the textures
After extracting the archive, decide what model you want to rip. For this tutorial I will be ripping Zekrom.
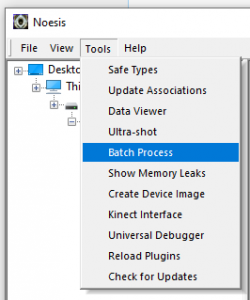
Open up Noesis and go Tools > Batch Process
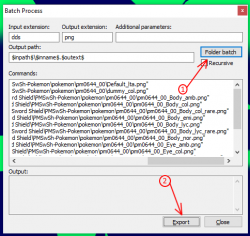
A window should then pop up. In the Input extension make sure it's says dds and in Output extension make sure it says png then replace $inpath$\$inname$_files\$inname$out.$outext$ with $inpath$\$inname$.$outext$ . You'll then want to press the Folder batch button and select the folder that contains the textures for your model, then press the Export button. This will convert all the .dds files into .png. After the textures have been converted, make a new folder somewhere for the rip and name it whatever the model you're ripping is. Inside that new folder make another folder called Textures then move all the .png textures you just converted into that folder.
Step 3a: "Fixing" the textures (Eye/Mouth)
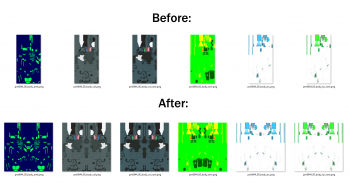
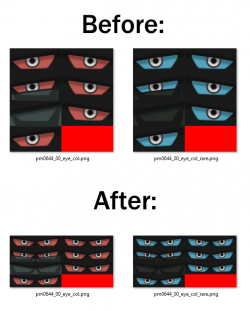 When ripping Pokemon models, most of the time the textures need to be fixed first.
Firstly, the eyes and mouth textures. To fix the "col" textures you'll need to double the width and mirror both sides of the texture.
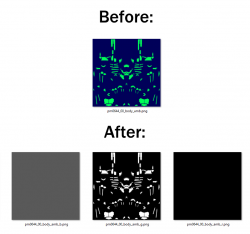
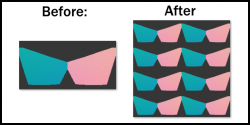 To fix the eye/mouth "nor" textures you need to tile them them to match the col textures. 2 across, 4 down.
Step 3b: "Fixing" the textures (Body)
Fixing the body textures are different. What you need to do is look at the normal map for the other textures. If it looks like it's symmetrical, then you'll need to edit the "amb", "col", etc. textures directly to match. Most of the time this is just done by doubling the canvas width and mirroring it to the right hand side.
Step 4: Splitting the textures
Any "amb" or "emi" textures in your rip should be split into their individual channels.
Step 5: Opening the model
If you don't have RandomTalkingBush's Pokemon MaxScript yet, make sure you grab it from here: https://mega.nz/file/HlpFXYDY#G9WcLuZupaCwboW3HRMoUS89oN-NQAK2UskZs-9rJOs
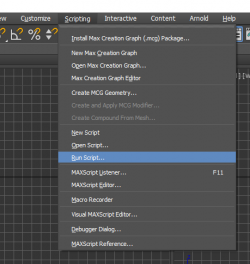
Move the .gfbmdl file from the folder the .dds textures were in to the same folder as your png textures. You'll then want to open up 3DS Max and go Scripting > Run Script and open the Pokemon Switch MaxScript.
A little window should pop up with a button that says "Import *.gfbmdl". Press it and it should ask you to open a .gfbmdl file. Select the one that's in your textures folder and it should import into 3DS Max.
Step 6: Rotation and resetting the Bind Pose
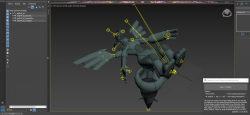
Select the root bone, in my case it's "pm0644_00", and rotate it 90 degrees on the X axis.
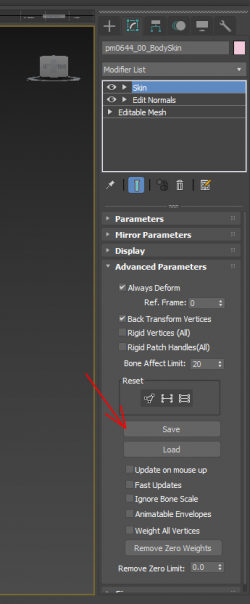
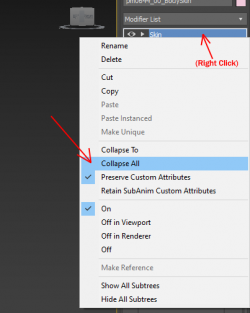
Now for every mesh in the scene, go to its "Skin" modifier and scroll down to "Advanced Parameters" and click "Save". Save it to somewhere you'll remember then right click the skin modifier and "Collapse All". Add a new skin modifier back onto that mesh and add all the bones onto it. Go back to "Advanced Parameters" but this time instead of pressing save, press load and select the envelope you saved earlier.
A "Load envelope" window should pop up. Press "Match by name" then press "Ok". Repeat this multiple times for the rest of the meshes until you've done them all.
Step 7: Exporting
Once you've reset the bind pose on all the meshes, you can now export your model as .fbx and .dae, go to the folder you created earlier that you put the textures folder inside of, and export them into that folder and you should be done and ready to render then submit! I highly suggest installing OpenCollada and exporting with that instead of the default collada exporter included with 3DS Max due to compatibility issues with other programs.

