Difference between revisions of "PVV"
(→Notes) |
|||
| (3 intermediate revisions by the same user not shown) | |||
| Line 1: | Line 1: | ||
[[File:PVVmain.png|thumbnail|right|Window Example]] | [[File:PVVmain.png|thumbnail|right|Window Example]] | ||
| − | PVV is a graphic viewing tool that reveals content hidden and disassembled within a Playstation save state. Unlike [[PSX-vram]], it can accept save states from any Playstation emulator capable of the function, and has more onscreen options to upload, find, assemble, and save the sprite with custom-set canvas sizes. | + | PVV is a graphic viewing tool that reveals content hidden and disassembled within a [[Playstation]] save state. Unlike [[PSX-vram]], it can accept save states from any Playstation emulator capable of the function, and has more onscreen options to upload, find, assemble, and save the sprite with custom-set canvas sizes. |
== Tutorial == | == Tutorial == | ||
| Line 29: | Line 29: | ||
Keyboard shortcuts: | Keyboard shortcuts: | ||
| − | * Arrow Keys: Moves graphics parameters (red outline). Hold Shift to adjust height and width. | + | * Arrow Keys: Moves graphics parameters (red outline). Hold Shift to adjust height and width. Hold CTRL to leap several pixels. |
* Numpad: Moves Palette parameters (Green outline). Hold CRTL to jump through several rows of palettes (Not recommended for games with small list of palettes). | * Numpad: Moves Palette parameters (Green outline). Hold CRTL to jump through several rows of palettes (Not recommended for games with small list of palettes). | ||
* F2: Saves output image | * F2: Saves output image | ||
| Line 45: | Line 45: | ||
4bpp can only show 16-colors, leaving the presented sprite with unnatural colors that don't fit the original, in-game presentation. Your first solution is to increase bpp to get all of the colors needed, but you then realize that increasing the bpp squishes the sprite, making it even more difficult to fix the problem. | 4bpp can only show 16-colors, leaving the presented sprite with unnatural colors that don't fit the original, in-game presentation. Your first solution is to increase bpp to get all of the colors needed, but you then realize that increasing the bpp squishes the sprite, making it even more difficult to fix the problem. | ||
| − | Instead of attempting to rectify the problem through simple [[Recolor|recoloring]], or splicing parts of a screenshot with the closest palette you can find (Which is NOT recommended due to | + | Instead of attempting to rectify the problem through simple [[Recolor|recoloring]], or splicing parts of a screenshot with the closest palette you can find (Which is NOT recommended due to PVV's palettes being slightly different in shade to the ones used in the screenshot), try and dig around the palette area for other colors that fit the original presentation of the sprite, then save them as separate files once you locate them, after which you can select and combine the parts that represent the original palette to complete the rip. |
You can also poke around the contents of the save state for other sprites that represent, or have never been seen anywhere in game. But be aware that the palettes for these sprites will not be in the same area as the ones tailored to the sprites shown next to the image, and some may require an increase in bpp in order to correct their squished appearance, so be prepared to spend more than a couple minutes sifting through the palettes for the proper colors to display the desired sprite. | You can also poke around the contents of the save state for other sprites that represent, or have never been seen anywhere in game. But be aware that the palettes for these sprites will not be in the same area as the ones tailored to the sprites shown next to the image, and some may require an increase in bpp in order to correct their squished appearance, so be prepared to spend more than a couple minutes sifting through the palettes for the proper colors to display the desired sprite. | ||
==Notes== | ==Notes== | ||
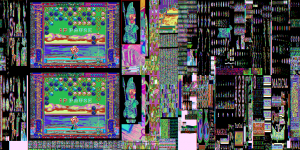
| − | [[File:PVVcontrollererror.png|thumbnail|right|Magical Drop III save state, created while | + | [[File:PVVcontrollererror.png|thumbnail|right|Magical Drop III save state, created while Controller 2 is active]] |
*Make sure only Controller 1 is active in the configuration section of pSX when save stating. If you attempt to save state while Controller 2 is active, the palettes may get screwed up, presenting you with an unnaturally colored sprite and screenshot. | *Make sure only Controller 1 is active in the configuration section of pSX when save stating. If you attempt to save state while Controller 2 is active, the palettes may get screwed up, presenting you with an unnaturally colored sprite and screenshot. | ||
*Be aware that PVV is a more helpful version of the ROM's v-ram. So whatever shows up on v-ram (press F11 if playing on a pSX emulator), will also end up on PVV with little to no improvements on the matter. | *Be aware that PVV is a more helpful version of the ROM's v-ram. So whatever shows up on v-ram (press F11 if playing on a pSX emulator), will also end up on PVV with little to no improvements on the matter. | ||
*As stated above, PVV's palettes are slightly different in shade to the original colors of the games, though not so much that it would be glaringly obvious. If you want the sprite to look as real as presented in the game, simply take a screenshot containing the sprite and use it to recolor the sprites saved through PVV. | *As stated above, PVV's palettes are slightly different in shade to the original colors of the games, though not so much that it would be glaringly obvious. If you want the sprite to look as real as presented in the game, simply take a screenshot containing the sprite and use it to recolor the sprites saved through PVV. | ||
Latest revision as of 05:15, 25 August 2014
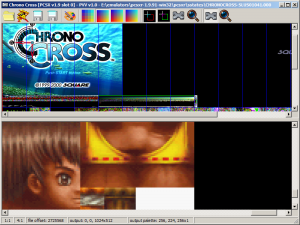
PVV is a graphic viewing tool that reveals content hidden and disassembled within a Playstation save state. Unlike PSX-vram, it can accept save states from any Playstation emulator capable of the function, and has more onscreen options to upload, find, assemble, and save the sprite with custom-set canvas sizes.
Contents
[hide]Tutorial
Save States
Depending on the emulator used, it is a simple matter of playing to the point where you want the sprite and the contents within the save state and using one of the following methods to creating the save state:
pSX
pSX has two methods of creating a save state: choosing one of 5 "Quicksave" slots, either by pressing F6-10 or accessing the slots in the Quicksave menu, or selecting "Save State" from the File menu and saving it to wherever suits your needs (you can even name your save state).
ePSXe
Accessing Save State in PVV
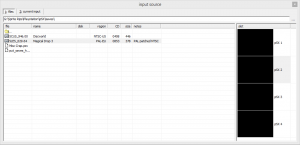
Upon activating PVV, it is a simple matter of locating the emulator's folder and accessing its "save" subfolder. Any game containing at least one save state will show up in the "input source" regardless of the emulator used. If a custom save state was made through pSX, it would be a simple matter of finding the file with .psv as its extension.
Clicking on the game will reveal the save slots and the image taken during the creation of the save state. Double clicking on the slot will load the state onto the input area of the program, allowing you to view every content within the exact point the save state was made, and other content relating to, or hidden from the final product.
PVV Interface
Almost everything in PVV is relative to PSX-vram, with some additional options to make accessing and saving sprites easier:
- Reveal "input source" (where the game saves are stored)
- Reload "input file"
- Save "input bitmap" (Saves the entire contents of the save state)
- Save "output bitmap" (Saves a cropped and arranged image from the work area)
- Show palette window
- bpp adjustment (from left to right -> 4, 8, 16, 24)
- Change output selection (Reveals grids and allows red parameters to be moved by mouse)
- Change palette selection (reveals grids to help align palettes shown in save state and allows palette parameters to be moved by mouse)
- Scroll and Zoom options (Left scroll and zoom icons control the output area, right scroll and zoom icons control the work area)
Using PVV
As seen above, sprites accessed through PVV can be viewed either by keyboard or with the mouse.
Keyboard shortcuts:
- Arrow Keys: Moves graphics parameters (red outline). Hold Shift to adjust height and width. Hold CTRL to leap several pixels.
- Numpad: Moves Palette parameters (Green outline). Hold CRTL to jump through several rows of palettes (Not recommended for games with small list of palettes).
- F2: Saves output image
- F3: Turns "input source" on and off
- +/-: move input image left or right.
Create Sprite with PVV
The first thing to look out for when accessing your chosen save state is the misalignment of the input bitmap. Each time a save state is accessed, the input bitmap will be 2-3 pixels to the left. Because of a lack of options to move the palette parameter one pixel at a time, it's best to move the entire image to the right in order to align the current palette within the parameter.
Depending on the game, certain sprites will be easy to spot, usually next to the original image taken along with the save state, and its associated colors can be found near the bottom of the palette section. Its only a simple matter of setting up the graphics parameter to find and reveal the full contents of the sprite, locate its natural palette, and save it to be fixed up in an image editing program.
There are a few problems when copying and saving multiple sprites for a full sheet. A save state created within the emulator can't be overwritten as long as PVV has access to it, so it's best to create two slots to switch back and forth between saves, or create a custom state using the "Save State" selection under File.
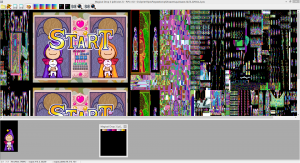
Another problem is that, due to bpp preferences, most sprites will not display the proper palette. An example below is a graphic view of the Hierophant sprite presented in 4bpp.
4bpp can only show 16-colors, leaving the presented sprite with unnatural colors that don't fit the original, in-game presentation. Your first solution is to increase bpp to get all of the colors needed, but you then realize that increasing the bpp squishes the sprite, making it even more difficult to fix the problem.
Instead of attempting to rectify the problem through simple recoloring, or splicing parts of a screenshot with the closest palette you can find (Which is NOT recommended due to PVV's palettes being slightly different in shade to the ones used in the screenshot), try and dig around the palette area for other colors that fit the original presentation of the sprite, then save them as separate files once you locate them, after which you can select and combine the parts that represent the original palette to complete the rip.
You can also poke around the contents of the save state for other sprites that represent, or have never been seen anywhere in game. But be aware that the palettes for these sprites will not be in the same area as the ones tailored to the sprites shown next to the image, and some may require an increase in bpp in order to correct their squished appearance, so be prepared to spend more than a couple minutes sifting through the palettes for the proper colors to display the desired sprite.
Notes
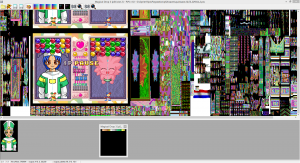
- Make sure only Controller 1 is active in the configuration section of pSX when save stating. If you attempt to save state while Controller 2 is active, the palettes may get screwed up, presenting you with an unnaturally colored sprite and screenshot.
- Be aware that PVV is a more helpful version of the ROM's v-ram. So whatever shows up on v-ram (press F11 if playing on a pSX emulator), will also end up on PVV with little to no improvements on the matter.
- As stated above, PVV's palettes are slightly different in shade to the original colors of the games, though not so much that it would be glaringly obvious. If you want the sprite to look as real as presented in the game, simply take a screenshot containing the sprite and use it to recolor the sprites saved through PVV.

