Difference between revisions of "Unity/Model Ripping"
(Created page with "When it comes to ripping models from Unity games, nine times out of ten its super simple. In this tutorial, you will be taught the correct method of ripping models from Unity...") |
|||
| (One intermediate revision by the same user not shown) | |||
| Line 37: | Line 37: | ||
===Step 7: Checking the model=== | ===Step 7: Checking the model=== | ||
| − | Open up your model in your 3d modelling software of choice and check that your textures and rigging are working correctly. If they are, then you can now delete the .fbx from before as it is useless now. Congratulations, you've now exported a Unity model. | + | Open up your model in your 3d modelling software of choice and check that your textures and rigging are working correctly. If they are, then you can now delete the .fbx from before as it is useless now. Congratulations, you've now exported a Unity model. You can now zip up the .dae and textures and submit it to the Models Resource. |
| + | |||
[[File:Tutorial - UnityModelRipping (7).png|400px]] | [[File:Tutorial - UnityModelRipping (7).png|400px]] | ||
===Closing=== | ===Closing=== | ||
Hopefully now you know how to rip from games that are made in Unity. If you have any questions or issues, feel free to PM Ziella on the forums or leave them in the talk page. | Hopefully now you know how to rip from games that are made in Unity. If you have any questions or issues, feel free to PM Ziella on the forums or leave them in the talk page. | ||
Latest revision as of 03:16, 4 June 2019
When it comes to ripping models from Unity games, nine times out of ten its super simple. In this tutorial, you will be taught the correct method of ripping models from Unity games.
Contents
Required Files & Tools
- The files for the Unity game you plan to rip from.
- Noesis
- The latest build of AssetStudio from AppVeyor.
- Notepad++
- A 3D Modelling Software (3DS Max, Blender, Maya, etc.)
Tutorial
Step 1: Finding the files
Before we can begin ripping the models, we need to find the files that contains them first. Navigate to the directory named either "GAMENAME_Data" (where GAMENAME is the name of the game) or the directory "bin/Data/". This is the main directory for the game.
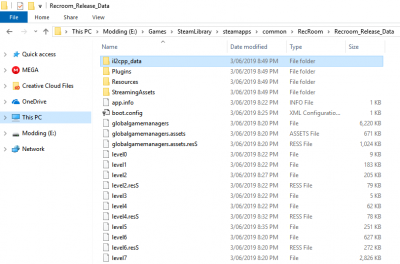
Step 2: Opening the Data directory in AssetStudio
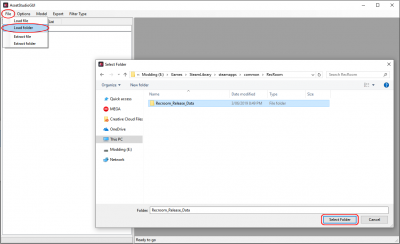
Open up AssetStudio, go to File > Open Folder and select the folder we found in the last step. It will start to load all the files in that folder and will take a while depending on how big the game is.
Step 3: Finding the model you want
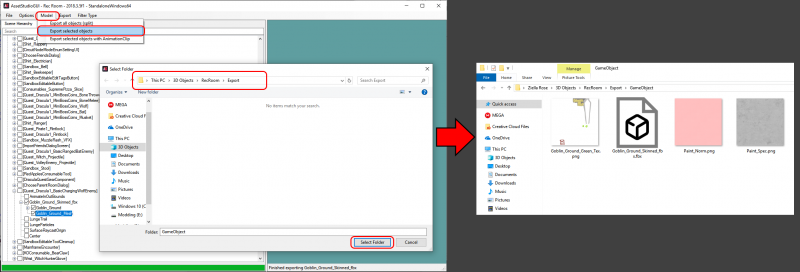
Once the game files have been loaded into AssetStudio, click on the Asset List tab and keep scrolling down and find the model you want to export. Once you've done that, right click it and press jump to scene hierarchy. This should take you to the models location in the scene hierarchy tab, from here you want to press the check mark on the parent of the mesh to select everything in that parent. In my case it took me to "Goblin_Ground_Mesh" so "Goblin_Ground_Skinned_fbx" is its parent, so that is what I select.
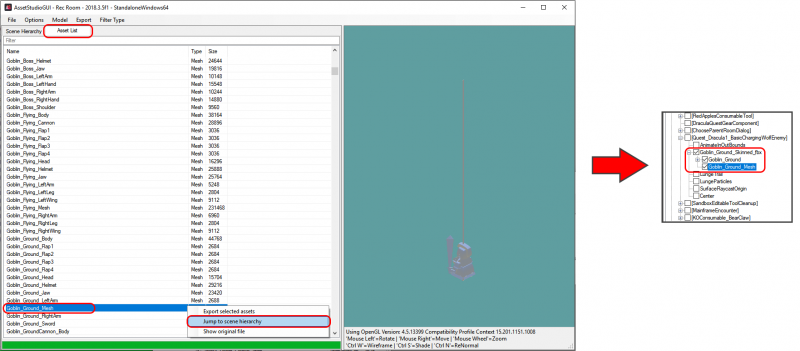
Step 4: Exporting the model to fbx
Once you've selected the object you want to rip in the scene hierarchy, go Model > Export selected objects. This should give you a prompt to select a folder. Select the folder you want to save the model into. Once you've done that, it will start to export and once its done it *should* open the folder it exported in automatically.
Step 5: Converting the .fbx into .dae
Feel free to close AssetStudio now if you want. Open up Noesis and navigate to the fbx you exported. Double click it to make sure the model you wanted is there. If it is, right click on the .fbx and press "Export". A prompt should now show up. Remove "out" from the end of the file name in the "Destinations file(s):" text box then set main output type to ".dae - COLLADA" and make sure that "Flip UV's" and "No animations" are checked. Once that is done, press Export.

Step 6: Fixing the texture paths
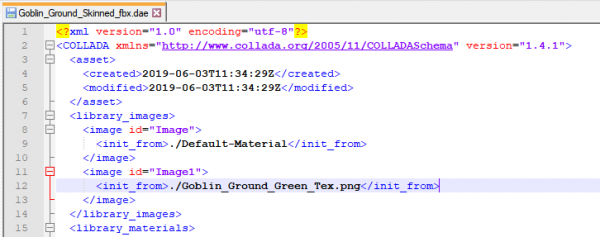
Open up the .dae you just exported in Notepad++ and look for any instances of "<init_from>". Make sure that it is formated similarly to this. You may need to add .png to the end of the file name or remove any excess bits from the start. This is so that programs reads the texture files from the same folder as the .dae file.
Step 7: Checking the model
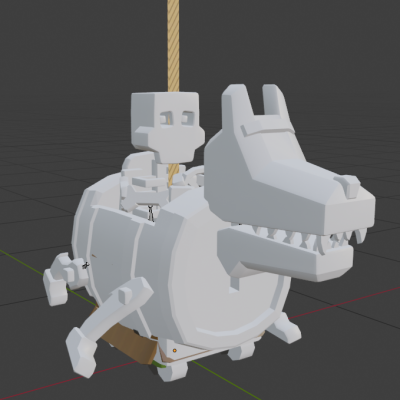
Open up your model in your 3d modelling software of choice and check that your textures and rigging are working correctly. If they are, then you can now delete the .fbx from before as it is useless now. Congratulations, you've now exported a Unity model. You can now zip up the .dae and textures and submit it to the Models Resource.
Closing
Hopefully now you know how to rip from games that are made in Unity. If you have any questions or issues, feel free to PM Ziella on the forums or leave them in the talk page.

